Why Klaviyo is the Top Email Tool for Shopify Stores
Klaviyo is purpose-built for ecommerce. Unlike generic email tools, it integrates directly with Shopify to sync:
Customer profiles
Product data
Browsing and purchase behaviour
Revenue per subscriber
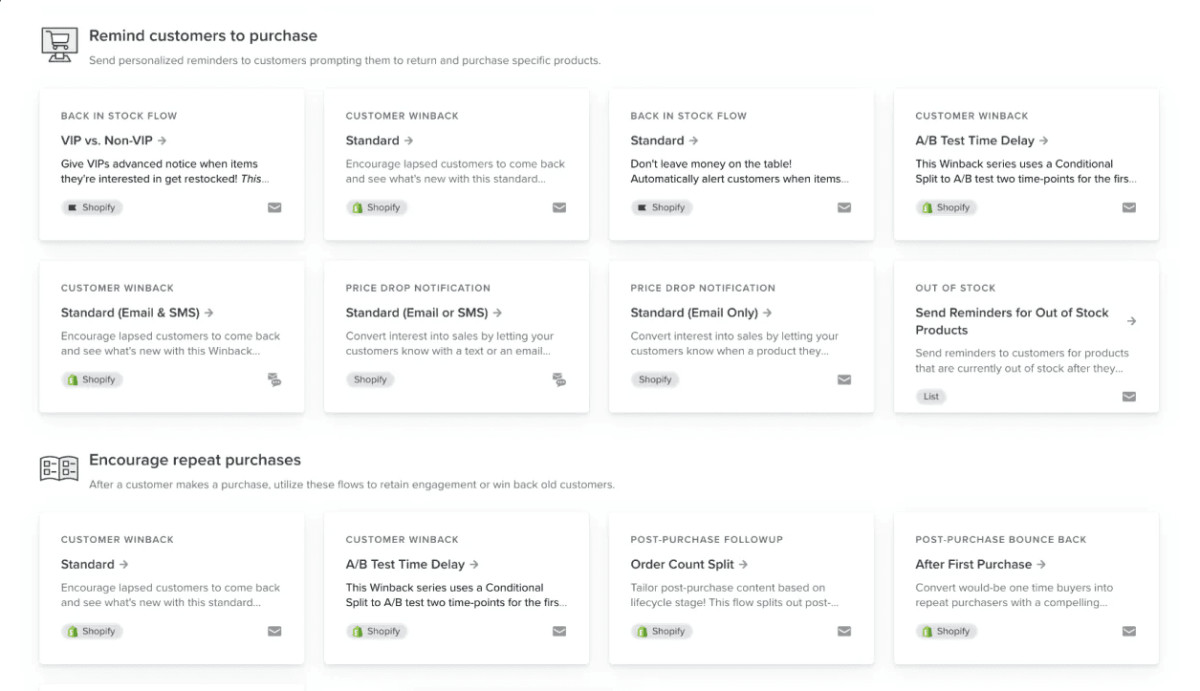
That means every form signup becomes fuel for smart automations like:
Welcome flows
Abandoned cart sequences
Back-in-stock alerts
Product recommendations
Loyalty/VIP segmentation
You’re not just getting an email address — you’re creating a data-rich user profile.
What You Need Before You Start
Before building your first Klaviyo form, make sure you’ve got:
A Klaviyo account (free plan available up to 250 contacts)
An active Shopify store
The Klaviyo Shopify integration installed from the Shopify App Store
Admin access to both platforms
A rough idea of your audience segments and lead magnet offers
How to Create a High-Converting Klaviyo Form
1. Go to “Sign-up Forms” in Klaviyo
Log into your account, navigate to Sign-up Forms, and click “Create Form”.
2. Choose the Right Form Type
You’ll see four types:
Pop-up – Attention-grabbing, best for homepage or intent-based offers
Flyout – Less intrusive, good for exit intent or scroll-depth targeting
Embedded – Great for blog posts, product pages, or footers
Full-screen – Bold, often used during major sales or launches
💡 Start with a pop-up or flyout unless you have a specific use case.
3. Design the Form
Use the drag-and-drop builder to:
Add a clear headline (“Get 15% Off Your First Order”)
Include a single email field (less friction = higher conversions)
Use action-oriented CTA text like “Get My Discount” or “Unlock Early Access”
Add branding elements (fonts, colours, imagery) to match your store
4. Configure Display Settings
Trigger after X seconds, scroll %, or on exit intent
Choose page-specific targeting (e.g., show only on product pages)
Limit frequency (so users don’t see it every visit)
5. Set Up Behaviour & Targeting
Choose the Klaviyo list or segment to send submissions to
Trigger a welcome email flow or lead magnet delivery
Set form visibility rules (e.g. “hide after submission”, “show only once per session”)
How to Embed a Klaviyo Form on Your Shopify Store
For Pop-up and Flyout Forms (Script-Based)
These are the easiest to launch — just add the Klaviyo script once.
Steps:
In Klaviyo, click Embed Code on your form
Copy the JavaScript snippet
In Shopify:
Go to Online Store → Themes → Actions → Edit Code
Open theme.liquid
Paste the script before the closing </head> tag
Click Save
Your form will now display based on the settings you configured in Klaviyo.
For Embedded Forms (Manual Placement)
These require pasting HTML where you want the form to appear.
Steps:
In Klaviyo, choose “Embedded” and copy the HTML code
Decide where to place it:
Pages: Go to Online Store → Pages, paste in content editor (HTML view)
Product templates: Add it in your product.liquid file or via sections
Blogs: Paste directly into the blog content editor
💡Test the live page to ensure the form displays and functions correctly.
Alternative Ways to Add Klaviyo Forms
Using Shopify Theme Sections
Most modern Shopify themes allow you to add custom HTML blocks via the theme customizer:
Go to Themes → Customize
Add a new “Custom HTML” section
Paste your Klaviyo form code
Drag it where you want it to appear (e.g., above footer)
Using Page Builders or Pop-Up Apps
If you use tools like PageFly, GemPages, or Shogun, you can insert Klaviyo forms via:
Custom HTML blocks
Widget integrations
Third-party pop-up tools that connect to Klaviyo
Best Klaviyo Forms to Test (By Store Type)
| Store Type | High-Converting Form Examples |
|---|---|
| Fashion & Apparel | Exit-intent 15% off pop-up with social proof |
| Health & Wellness | Scroll-triggered flyout with “Get my skincare guide” |
| Home Goods | Embedded form in blog post with gated checklist |
| Subscription/DTC | Multi-step quiz form for personalisation + segmentation |
| Premium Products | Post-purchase VIP opt-in on thank-you page |

Optimisation Tips: Make Your Forms Work Harder
Craft Irresistible Offers
Lead with something valuable. Think:
“10% off your first order”
“Free shipping when you subscribe”
“Get our holiday gift guide”
“Early access to product drops”
Write Benefit-Driven Copy
Don’t say “Sign up for emails”. Say what’s in it for them:
“Be the first to shop our seasonal drops”
“Join 15,000+ subscribers who get exclusive perks”
A/B Test Your Forms
Test:
Button text (“Get Offer” vs “Unlock Deal”)
Headline tone (urgency vs exclusivity)
Image vs no image
Single-step vs multi-step
Exit intent vs time-based triggers
Prioritise Mobile UX
Keep copy short
Use larger input fields/buttons
Avoid full-screen takeovers that block the entire experience
Advanced Strategies to Scale Form Performance
Segment-based forms: Show different offers to new vs. returning users
Geo-targeting: Offer local shipping perks based on visitor country
Quiz-to-email flows: Use forms to collect preference data, not just emails
Dynamic fields: Pre-fill emails if user is already in Klaviyo’s database (on return visit)
Trigger automated flows: Connect form opt-ins to flows like post-browse, seasonal offers, or VIP tiers

Common Issues & How to Fix Them
| Problem | Likely Cause | Fix |
|---|---|---|
| Form not showing | Script not installed / display rules too strict | Double-check embed and trigger settings |
| Not capturing emails | Wrong list, validation error, or JS conflict | Test form submission and check list settings |
| Mobile glitching | Form not optimised or overlapping UI | Use Klaviyo’s mobile-specific design editor |
| Site loading slow | Large assets in form | Compress images or lazy-load the form script |
Track What Matters
Monitor:
Form views vs submissions (conversion rate)
Source of traffic (where conversions come from)
Which offers perform best over time
Subscriber lifetime value by form
💡 Pro Tip: Always name your forms with intent + page: Popup_Homepage_Discount, Embed_Blog_HolidayLeadMagnet, etc.

How to Embed a Klaviyo Form on Shopify — and Turn It Into a Revenue Driver
A Klaviyo form is your first step in turning a visitor into a buyer, and then a repeat customer.
The difference between “just embedding a form” and building an email engine comes down to strategy:
Right message
Right timing
Right offer
Tracked and tested consistently
Start with one form. Watch the numbers. Then optimise.
Your future customers are already on your site. Make it easy for them to raise their hand and say, “I want in”.